Burmese Mon – Pagan Bronze 8 Scene Stele
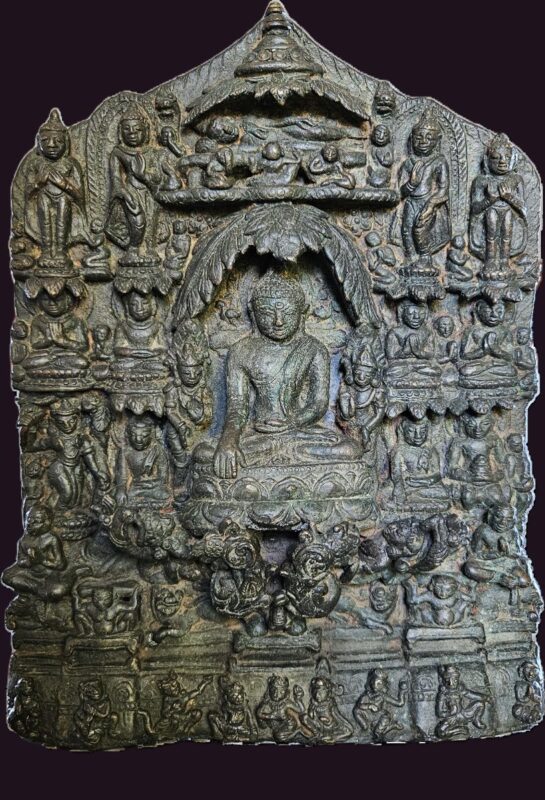
Rare Bronze Burmese Stele: 8 Great Events & 7 Weeks
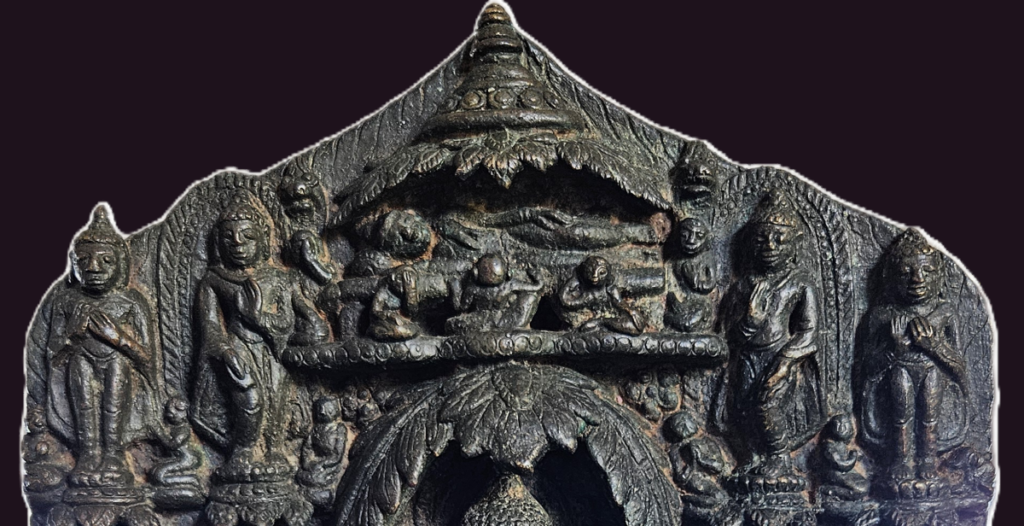
This description of this rare Burmese Mon – Pagan bronze 8 scene stele depicting the Eight Great Events before enlightenment and seven weeks after enlightenment is my interpretation based on comparative iconography and Buddhist texts. The interpretation relies on textual traditions and comparative art history, acknowledging that regional artisans occasionally departed from standard layouts due to creative or technical choices.
All descriptions reflect a face-on viewing perspective, resulting in certain scenes appearing reversed relative to literal texts. For example, the Nativity scene depicts the infant Buddha to the viewer’s left of Queen Maya, though textual tradition places his birth on her right side. Regional casting techniques and a focus on symmetry account for this common visual inversion.
The Lower Register (bottom of stele)
At each outer corner of the base a devotee is seen kneeling with their hands clasped in Anjali mudra (the gesture of adoration), likely representing the primary donors or the merchant brothers Tapussa and Bhallika from the final week of the post-enlightenment narrative.
Positioned second from the left is a distinct and easily recognizable figure: the Earth Goddess, known as Bhumidevi in India, Vasundhara in Pali, and Wathundaye in Burma. She is a central figure in Southeast Asian Buddhist iconography, depicted here in her traditional posture wringing a torrent of water from her long hair. This water, symbolizing the accumulated merit of the Buddha’s boundless almsgiving in past lives, washes away the attacking forces of Mara.
To the right of the Earth Goddess is a female figure with its arm raised, possibly representing the chaotic retreat of Mara’s forces after the Earth Goddess Vasundhara wrung out her hair to create a flood that swept the army away. To her right are another four female all with different postures representing the daughters of Mara sent to seduce and distract the Buddha on the eve of his enlightenment.
While early classical texts identify three primary daughters, Lust (Raga), Craving (Trisna), and Discontent (Arati) regional literature and artistic traditions frequently expand this retinue to include additional personifications such as Pride and Fear. The inclusion of five dancing or gesturing maidens across the base directly mirrors the compositional conventions found on several Northeast Indian Pala stelea, which visually depict the full scale of Mara’s temptation.

Maras Daughters
Upon witnessing their father’s profound sorrow, Mara’s daughters questioned the source of his grief. Mara lamented his failure to thwart the Buddha, exclaiming: “My women, this great recluse is escaping from my power. Long have I watched, but in vain, to find some fault in him; therefore, it is that I am sad and sorrowful.” Driven by this confession, the daughters resolved to intervene, descending to the Bodhi tree to deploy their charms against the enlightened one.
The daughters promise to their father
Saying to their father “We will subject him (the Buddha) to our influence and come back bringing him captive with us.”
Crowned Figure
Positioned on the far right of the base, just to the left of the kneeling devotee, a crowned masculine figure rests with his elbow bent and his hand on his chest. His relaxed posture supports two compelling iconographic interpretations within early Burmese-Pala art.
This crowned figure may represent the Crowned Buddha (Jambupati), serving as a symbolic portrait of spiritual royalty. In this context, the crown reflects his cosmic sovereignty, while his relaxed posture denotes his absolute unshakeability and fearlessness after successfully resisting the terrifying armies and sensual temptations deployed by Mara’s daughters.
Or alternatively, within classic Pala compositional layout, this figure represents King Mara himself following his crushing defeat. As a celestial ruler, Mara is invariably depicted wearing a royal crown and elaborate regalia. Positioned here in submission opposite the Earth Goddess, his raised hand signifies his compliance, pacification, and ultimate surrender to the spiritual authority of the enlightened Shakyamuni.
The Buddha’s Victory over Mara’s Daughters
Seated in the bhumisparsha mudra, the central Buddha ignores the temptations of Mara’s daughters. He remains deeply absorbed in meditation, his mind entirely liberated from the cycle of rebirth and fully resting in the bliss of detachment.
Confounded by his unshakeable calm, the daughters were forced to admit defeat, conceding their failure, they stated “Our father spoke the truth indeed. The saint, the Well-Farer of the world, is not easily led astray.” With this realization, they departed and returned to their father.
THE NAGA KINGS – (the central tier above the base)
The lotus pedestal on which the central Buddha is seated is flanked and supported by two Naga kings, a race of semi-divine half serpent, half human creatures, underneath each of the Naga kings is a figure of a lion. (see image)
Two Naga kings, Nanda and Upananda created a golden thousand petaled lotus, the size of a chariot wheel, with a diamond stem, this we assume refers to the double lotus pedestal on which the Buddha sits. The Naga kings when depicted in the eight-scene stele are traditionally seen holding up the pedestal. Each of the Naga kings is shown with a cobra shaped serpent covering the back of their heads and extending down their backs, very much an Indian Buddhist/Hindu influence.
Underneath the Lotus pedestal is a decorative section, possibly the diamond stem, mentioned above, with the face of an elephant protruding from the centre. (see image)
On each side of the Naga Kings there is a crouching demon, also referred to as Mara Kanyas. Mara’s horde of demons are described as having large faces, bulging drooping bellies, sometimes with animal heads, or one-eyed, or having faces in place of bellies, they make all kinds of grimaces and expressions to frighten the Buddha.
This type of grotesque imagery is depicted in the Sanchi reliefs in the state of Madhya Pradesh in India with variations, some are seen squatting with a pot belly, large head, flat nose, big mouthed and with gigantically proportioned bodies. The figures on the far left and far right, above the figures of a kneeling elephants and in line with the Naga Kings are possibly the Buddha’s two most important disciples Sariputra and Maudgalyayana.

The Kneeling Elephants
Positioned directly above the bottom register on both the left and right sides are two outward-facing, kneeling elephants. These figures are intimately tied to the narrative framework of the Eight Great Events, specifically referencing the Parileyyaka forest narrative.
As suggested in the pioneering research of the late art historian John C. Huntington (Leaves from the Bodhi Tree), the inclusion of these recumbent or kneeling elephants finds its origins in the Dhammapada Atthakatha (the commentaries on the Dhammapada). According to this Theravada text, while the Buddha was meditating alone in the wilderness, a loyal elephant attended to his daily needs by bringing him water and clearing debris. A wild monkey observed this elephant’s profound devotion and was inspired to emulate it, subsequently presenting the Buddha with the gift of a wild honeycomb.
Huntington notes that while this specific elephant-monkey pairing is a defining narrative detail in textual traditions, its explicit visual inclusion as a structural motif at the base of a stele is an uncommon and highly localized feature. The presence of these elephants serves as an iconographic bridge, illustrating the exact forest environment where the monkey’s miraculous offering took place.

The Nativity Scene – Buddha’s birth
(First register looking face on)
The Nativity and the First Steps Positioned on the left register, level with the central pedestal, is the depiction of the Buddha’s miraculous birth and his subsequent first steps. Queen Maya stands grasping the branch of the Sala tree; uniquely, this casting omits the traditional attendant deities (such as Indra or Prajapati) to focus entirely on the mother and child.
From a direct, face-on viewing perspective, the infant Buddha stands to Maya’s left, an artistic inversion of the textual tradition which states he emerged from her right side. The newborn prince is already depicted with a distinct, miniature usnisha (cranial bump), signifying his innate spiritual perfection.
The small Buddha stands upright to represent the seven steps he took immediately after birth to declare his final inheritance of the Dhamma. Directly adjacent to this scene, filling the inner register, is a small figure of the seated Buddha in bhumisparsha mudra, seamlessly weaving a station of the post-enlightenment cycle into the biographical narrative.
Offering alms to the Buddha after Enlightenment
(Opposite side) – Right inner Register
The Offering of Trapusa and Bhallika (Week 7) Positioned on the opposite side, filling the intermediate register to the right of the central pedestal, is a seated Buddha in bhumisparsha mudra flanked by two kneeling figures holding an alms bowl. This scene depicts the final week of the post-enlightenment cycle (Rajayatana Sattaha) and features the merchant brothers Trapusa and Bhallika, recognized as the Buddha’s first two lay disciples.
As recorded in the Vinaya section of the Tipitaka, the brothers encountered the Buddha at the conclusion of his seven-week meditation and offered him his first meal of rice cakes and honey. The inclusion of the alms bowl in this casting directly references the accompanying textual miracle where the Four Heavenly Kings provided the Buddha with the vessels necessary to accept the merchants’ food. Placing this scene at the base level serves as a narrative conclusion to the Seven Weeks cycle, celebrating the moment the Dhamma was first brought into the realm of lay devotees.
THE FIRST SERMON
(Second register)
The Left Second Register: The First Sermon at Sarnath Positioned directly above the Nativity scene on the left register is the depiction of the First Sermon at Sarnath, where the Buddha turned the Wheel of the Law (Dharmachakra Pravartana) before his first five disciples in the Deer Park. The Buddha is depicted seated with his hands held before his chest in the dharmachakra mudra, the universal gesture of teaching and cosmic instruction.
Art historians note that this specific mudra creates an interesting iconographic crossover on miniature steles; the same hand gesture is also employed to represent the Great Miracle of Sravasti (The Twin Miracle), during which the Buddha multiplied his form to confound heretics. Within the strict structural conventions of Burmese and Pāla narrative layouts, however, this specific register position is traditionally reserved for the Sarnath sermon, establishing the foundation of the Buddhist monastic order directly above the scene of his earthly birth.


CENTRAL FIGURE – BUDDHA
The Central Icon: The Enlightenment at Bodh Gaya
The focal point of the stele features the historical Buddha, Shakyamuni, seated in the padmasana (lotus posture) upon an elevated lotus throne. His right hand is extended downward in the bhumisparsha mudra (earth-touching gesture), calling upon the earth to witness his accumulated merits and seal his absolute enlightenment under the canopy of the Bodhi tree.
Flanking the central Buddha are two standing attendants adorned in elaborate princely regalia, reflecting an archaic Indianized court style rather than standard monastic attire. In Indian and Himalayan Pāla prototypes, these figures represent the great Mahayana Bodhisattvas, Avalokiteshvara and Vajrapani, acting as cosmic guardians of the throne. While later, orthodox Burmese Theravada steles frequently modified these attendants into the simple, robe-clad figures of the chief disciples Sariputta and Moggallana, the preservation of royal dhotis and crowns on this casting underscores the early, pre-Pagan stylistic lineage of the piece.
Positioned symmetrically behind the Buddha’s shoulders, nesting against the backrest arch, are two outward-facing hamsa (sacred goose) birds. In traditional Northeast Indian art, the hamsa was a standard decorative motif symbolizing spiritual purity. When integrated into Southeast Asian craftsmanship, it carried profound local significance as the primary totem animal of the Mon culture, which heavily influenced the early artistic foundations of Central Thailand and the historic Pagan Kingdom of Myanmar.
TAMING OF THE NALAGIRI ELEPHANT (top right register)
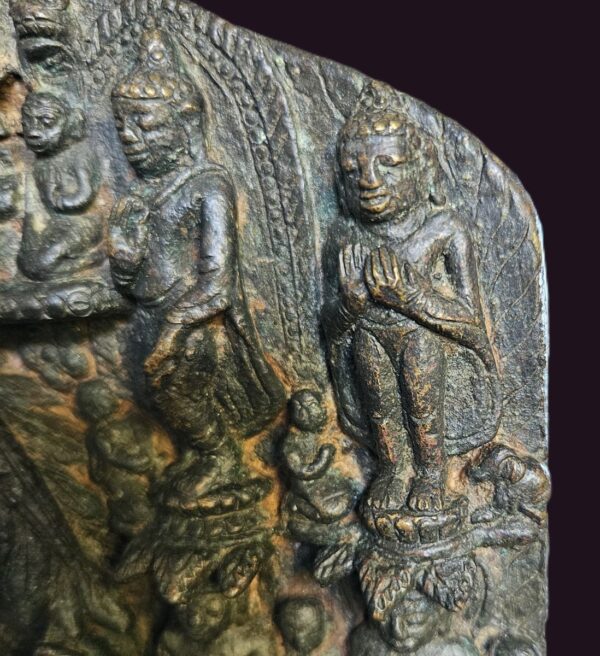
The standing figure of the Buddha depicts the taming of the wild elephant Nalagiri at Rajagriha. A miniature elephant kneels in submission at the Buddha’s feet, while a small accompanying figure represents his loyal disciple Ananda, who historically stepped forward to shield the Buddha from the charging animal.

The Descent from Tavatimsa Heaven
Balanced symmetrically on the opposite register, the standing Buddha depicts his descent from Tavatimsa Heaven. According to Theravada tradition, the Buddha ascended to this celestial realm during the three-month rains-retreat to preach the Abhidhamma to his deceased mother, Maya. To maintain his earthly presence and collect alms during this period, text describes the Buddha creating a duplicate manifestation of himself to continue preaching. Squeezed into the tight space of this register, the kneeling figures represent the attendant deities Indra and Brahma welcoming him back to earth.
The Inner Canopy: The Architectural Fusion of Mucalinda
Forming an arch over the standing figure of the Buddha, the decorative canopy terminates on both sides with outward-facing Naga heads rearing up from the throne structure. The artisan has cleverly transformed a standard architectural frame into a representation of the Naga King, Mucalinda. This element represents Week 6 of the seven weeks post-enlightenment, where the serpent king coiled beneath the meditating Buddha and raised his hood to shield him from a torrential rainstorm. This fluidly integrates the narrative of the Seven Weeks directly into the primary throne architecture.
THE BUDDHA IN PARINIRVANA
The top register depicts the Parinirvana (the death of the Buddha), showing the historical Buddha reclining as his five distraught disciples weep and gesticulate in profound grief. Directly above the dying Buddha are the leaves of the twin Sala trees, surmounted by an unusually large stupa.